Optimising the Fonts on My Website
How I changed my font loading strategy and reduced the first stage fonts by over 100 kB.
I’ll admit, I visit my own website a lot more than I reasonably should. One of my biggest peeves about my website was the time taken to load the display font—the titles would initially render in Georgia and after a few seconds there would be a layout shift when my chosen font, Tiempos Headline, finally loaded! I read an excellent article by Zach Leatherman, Developing a Robust Font Loading Strategy for CSS-Tricks, which inspired me to change my font loading strategy and massively reduce initial load times.
Before Optimising the Fonts
Before I decided to optimise the fonts on my website, I was loading four web fonts on the home page and up to seven web fonts on some other pages! These amounted to a staggering 145kB:
- Tiempos Headline, 31.3kB
- Tiempos Headline Bold, 30.2kB
- IBM Plex Sans, 17.9kB
- IBM Plex Sans Bold, 18.7kB
- IBM Plex Sans Italic, 19.5kB
- IBM Plex Mono, 13.7kB
- IBM Plex Mono Bold, 14.1kB
Opening up the Network panel in Chrome DevTools showed the time taken to download all four web fonts on the home page. I disabled cache and loaded the page on a throttled Slow 3G network. The waterfall graph below shows the times taken for the fonts to load, over a period of 10 seconds:
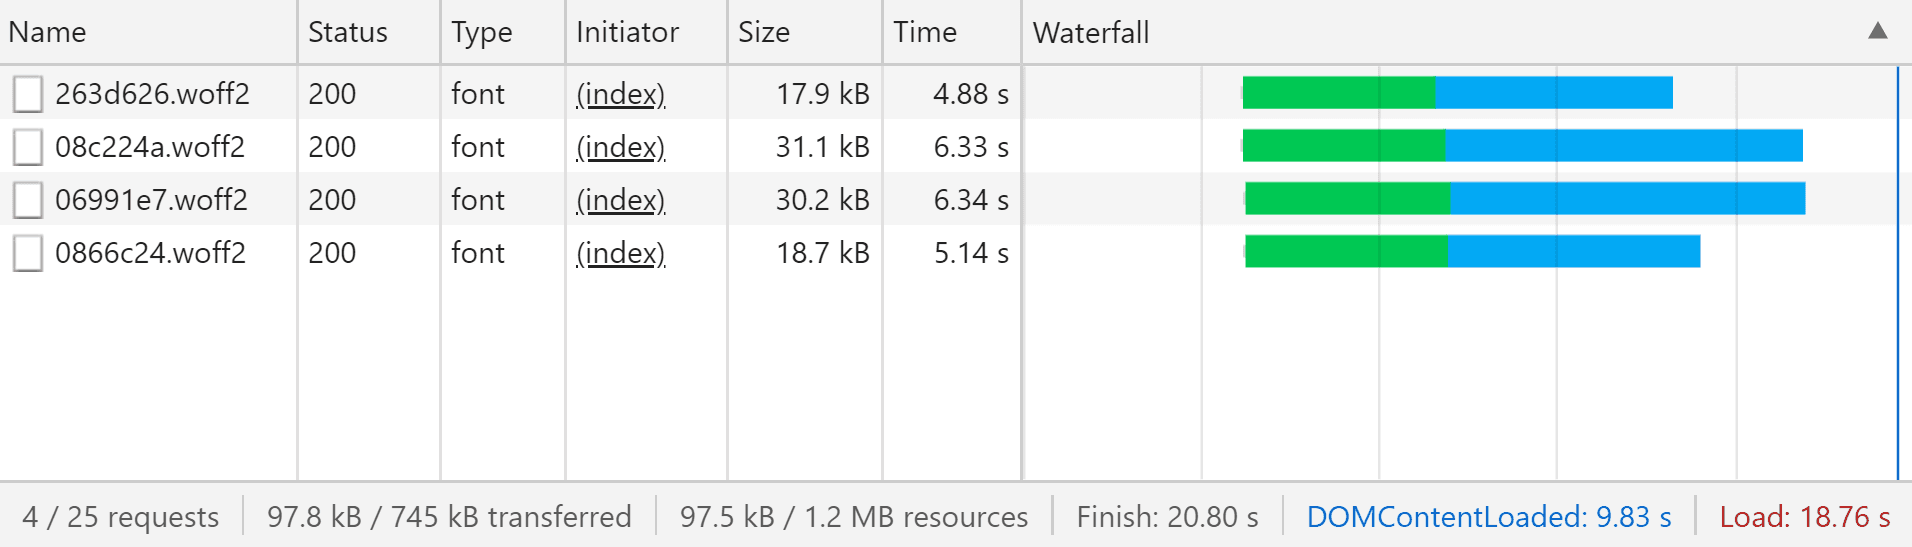
The fonts were all requested just after 2 seconds, and the last font finished loading more than 6 seconds later. Because of the time taken to load the fonts, the page is initially rendered with fallback fonts, which then causes a layout shift when the web fonts finally load.
Font Loading Strategies
Before we go any further, it’s about time we talked about font loading strategies. Font loading strategies dictate when the fonts on your page load, how the fonts load, and what happens whilst the fonts are loading; I find the best way to group font loading strategies is by describing how the font appears before the font loads.
Flash of Invisible Text
FOIT is the default browser behaviour which renders the text invisible whilst the font is loading. The text will be invisible during the swap period, up to 3 seconds depending on the browser: this is a particularly poor experience for users as there may be up to 3 seconds when they cannot read the content of your website!
Flash of Unstyled Text
A FOUT occurs when the browser renders the fallback system font while the web font is loading. By default, the fallback font will render after the 3 second swap period, or if the web font fails to load. FOUT is preferable to FOIT, as users can still read the content whilst the web font is loading; however, care must be taken to minimise the layout shift when the web font does load.
Flash of Faux Text
FOFT is very similar to FOUT, in that you render text as soon as possible without waiting for the web font to load. However, instead of the browser rendering a fallback system font, the browser renders a “Roman” web font. A “Roman” web font is a subset of the full web font, which often supports exclusively Western European languages and a reduced set of features. The browser uses font synthesis to render “faux bold” and “faux italic” text while the full web font continues to load.
Zach Leatherman really is the authority on everything web fonts—I encourage you to read his Web Font Loading Glossary and Guide to Font Loading Strategies for all the different ways of loading fonts!
Do I Really Need This Many Web Fonts?
Retrospectively, it seems crazy to load seven web fonts on a single page of my website. I encourage you to ask yourself, “Why am I actually using this web font?”—I couldn’t come up with any explanation aside from the fact that I like fonts! I wasn’t relying on any special ligatures for my code blocks, nor features like tabular numbers.
Instead of browsing Google Fonts for new fonts on my website, I decided instead to take a look at the system fonts already on my device. Obviously the fonts available on each device vary, so here are some great resources I used:
- CSS Font Stack shows the percentage of Windows and Mac devices which support some common fallback system fonts.
- System Font Stack article on CSS-Tricks which has some good snippets for body font.
- Using UI System Fonts a longer article on Smashing which explains which fonts target which systems.
In a surprise move, I decided to use system fonts for both the body font and monospace font on my website. Here’s the fonts I chose to use:
body {
  font-family: -apple-system, BlinkMacSystemFont, "Segoe UI", Roboto, Helvetica,
    Arial, sans-serif;
}

code {
  font-family: Monaco, Consolas, "Lucida Console", monospace;
}
body {
font-family: -apple-system, BlinkMacSystemFont, "Segoe UI", Roboto, Helvetica,
Arial, sans-serif;
}
code {
font-family: Monaco, Consolas, "Lucida Console", monospace;
}Implementing a FOFT Font Loading Strategy
I decided to implement the flash of faux text font loading strategy for the display font on my website, used for headings and buttons. I broke this down into four stages:
- Picking a font to use
- Subsetting the font into two stages
- Preloading the first stage font
- Loading the second stage font as soon as possible
Picking a Font
The number of fonts in Google Fonts is increasing every day and is becoming the go-to for all web fonts. I was really excited that Inter had made its way to Google Fonts, where I expect it will make its way to being one of the most popular web fonts. But I wanted a fancy display font, something similar to Tiempos Headline which I was using previously.
I settled on DM Serif Text by Colophon Foundry and Frank Grießhammer. There is also a higher contrast DM Serif Display, but I much preferred the thicker strokes of DM Serif Text on the relatively small headings on my website. Both fonts are licensed under the Open Font License, which importantly allows for modification.
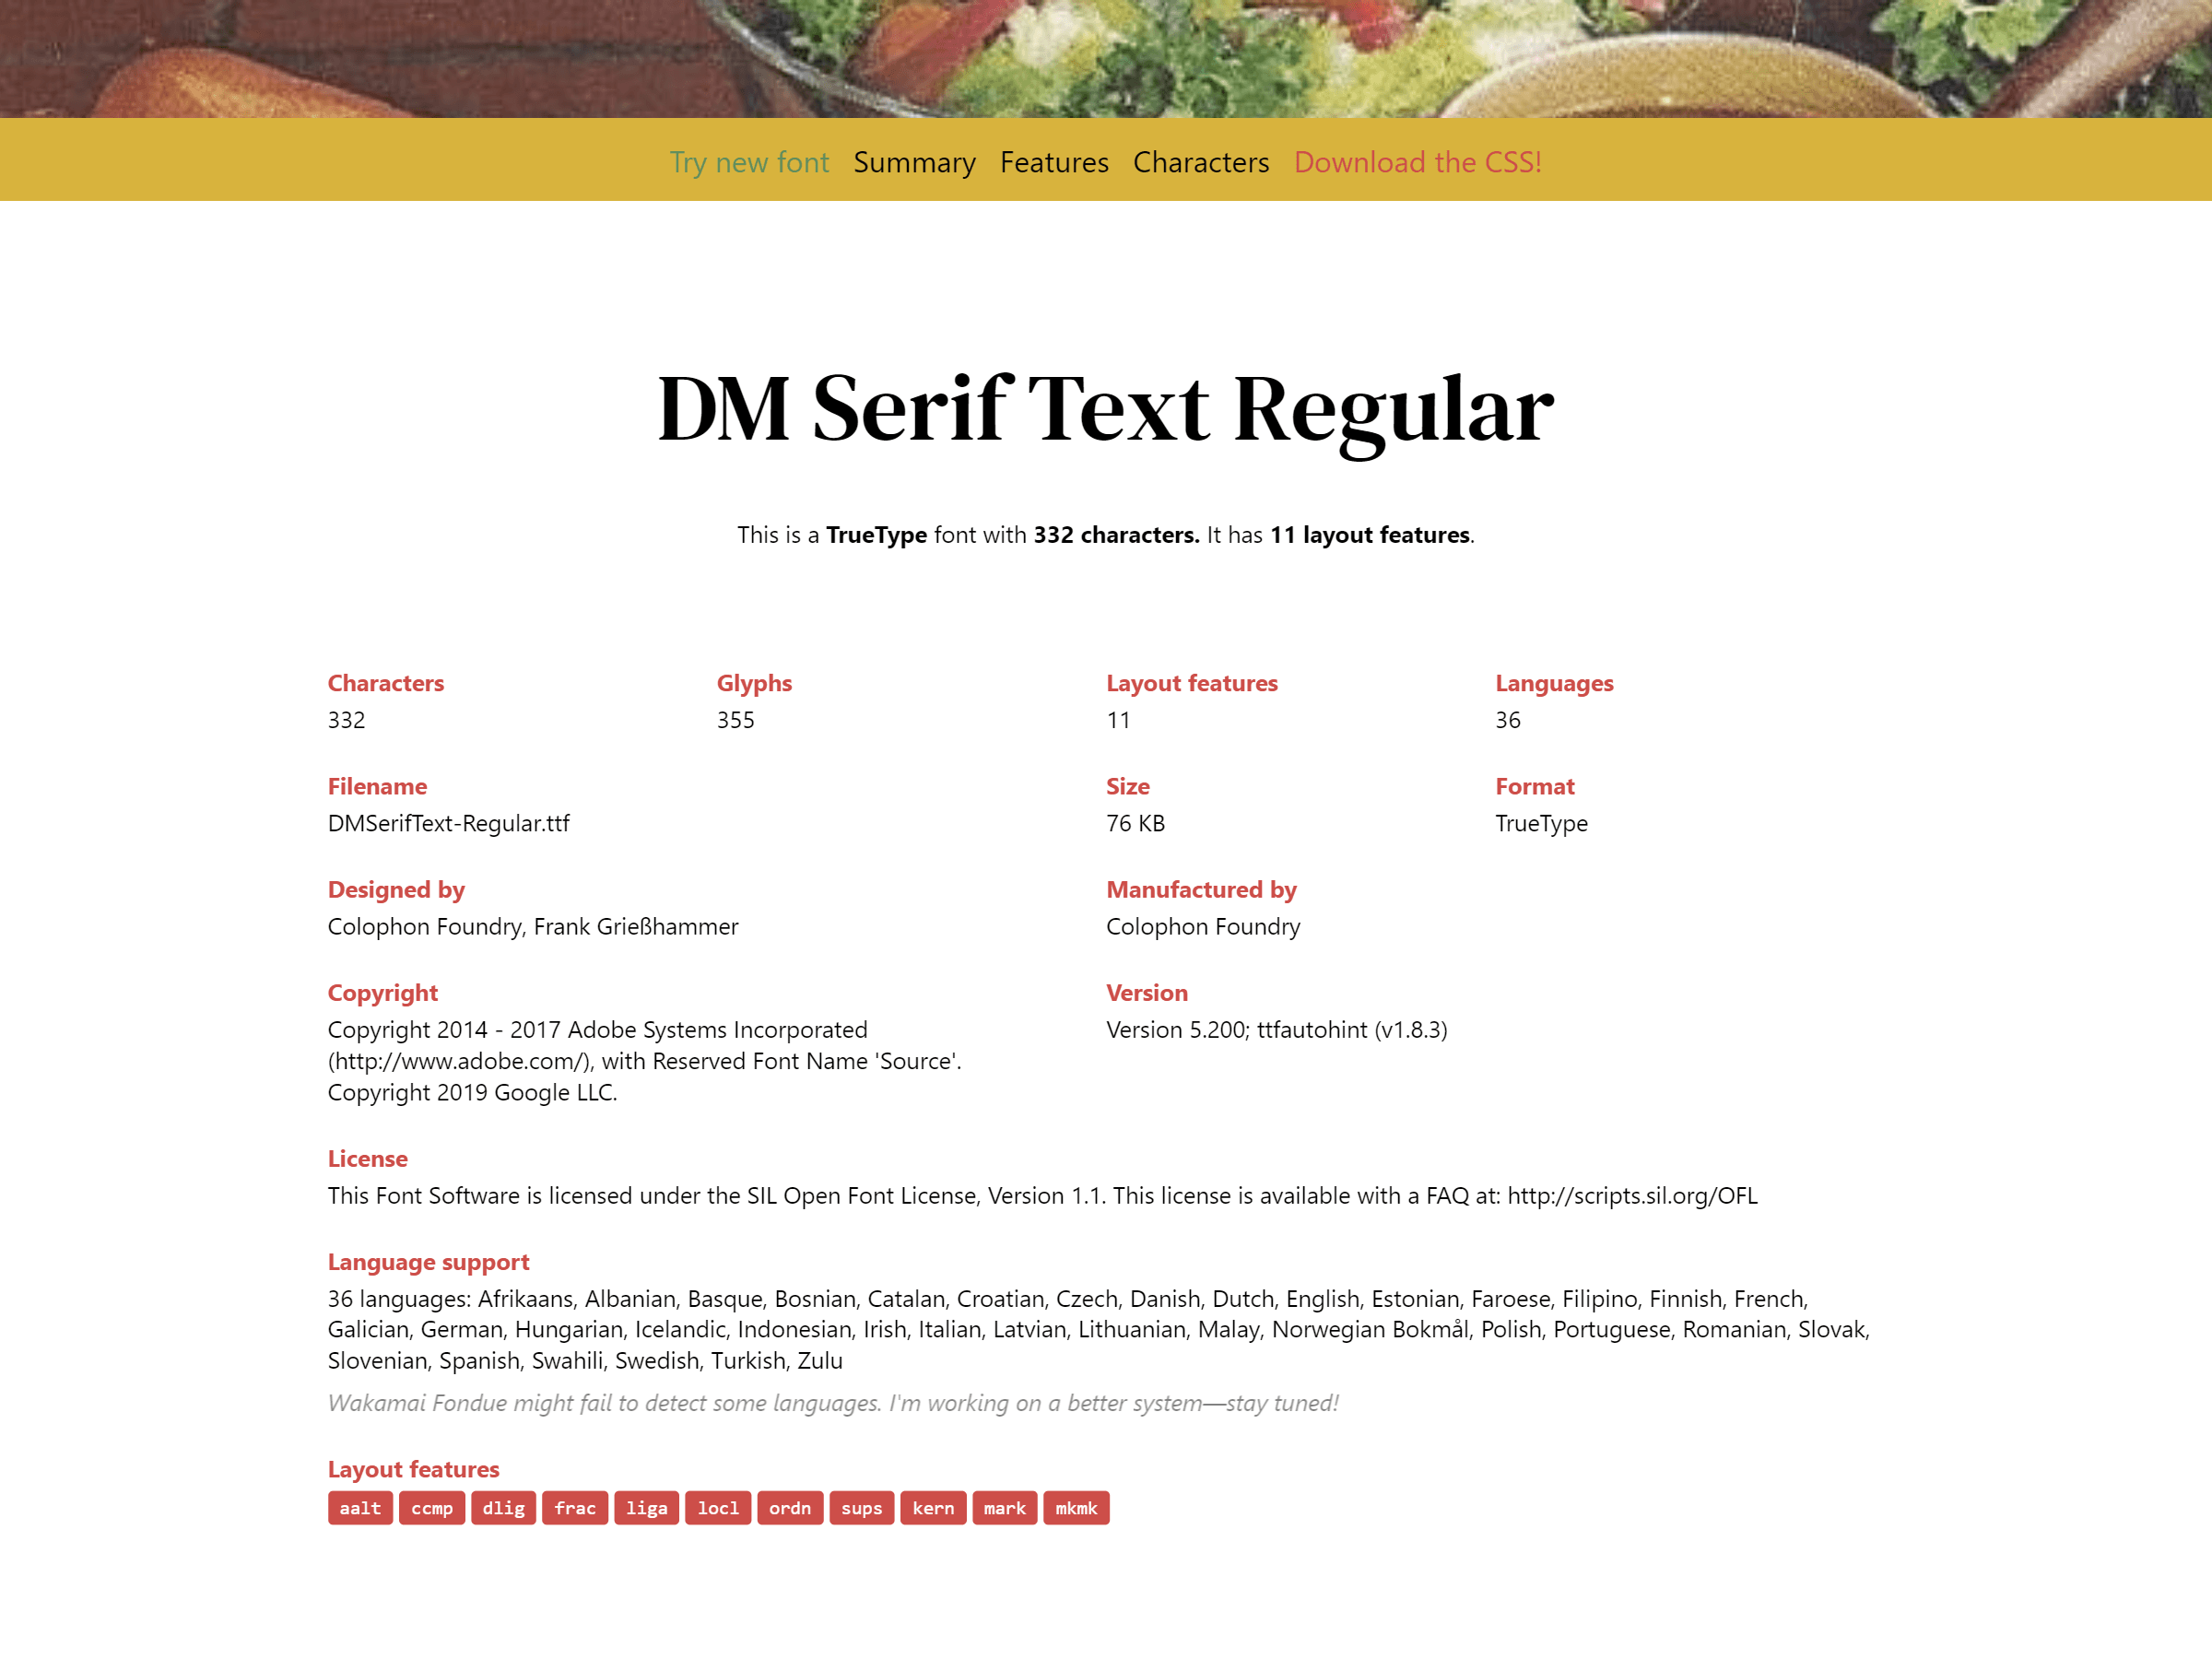
I’d like to quickly draw your attention to a fabulous tool I discovered, which answers the question, “What can my font do?” Possibly the best-named website ever, Wakamai Fondue provides a drag-and-drop interface for discovering what your font can do—I dropped DM Serif Text onto Wakamai Fondue to find out which features it supported and how many characters it contained. This wasn’t necessary but provided some nice context to the font sunsetting which was coming next!
Subsetting a Font
First of all, download the font you want from Google Fonts (or wherever), all you need is the .ttf file. In order to subset the font, I used pyftsubset from fonttools. It’s straightforward to install if you have pip already, simply run
pip install fonttoolspip install fonttoolsFirst Stage Font
You want your first stage font to be as small as possible, so the FOIT or FOUT before your font loads is unnoticeable; that means removing all the characters you don’t need as well as the extra features of the font.
One decision you need to make is whether to remove the kerning from the font file. On one hand, removing the kerning will reduce the size of the font considerably. On the other hand, removing the kerning will cause a layout shift when the full font finally loads. I chose to remove the kerning from my first stage font, so I subsetted DM Serif Text using the following command:
pyftsubset "DMSerifText-Regular.ttf" --output-file="DMSerifText-Regular-Roman.woff2" --flavor=woff2 --layout-features=ccmp,locl,mark,mkmk --no-hinting --desubroutinize --unicodes=U+0000-00FF,U+0131,U+0152-0153,U+02BB-02BC,U+02C6,U+02DA,U+02DC,U+2000-206F,U+2074,U+20AC,U+2122,U+2191,U+2193,U+2212,U+2215,U+FEFF,U+FFFDpyftsubset "DMSerifText-Regular.ttf" --output-file="DMSerifText-Regular-Roman.woff2" --flavor=woff2 --layout-features=ccmp,locl,mark,mkmk --no-hinting --desubroutinize --unicodes=U+0000-00FF,U+0131,U+0152-0153,U+02BB-02BC,U+02C6,U+02DA,U+02DC,U+2000-206F,U+2074,U+20AC,U+2122,U+2191,U+2193,U+2212,U+2215,U+FEFF,U+FFFDNotice we retain the required layout features ccmp,locl,mark,mkmk which we could see in Wakamai Fondue. If you wanted to include kerning in your first stage font, you’ll want to change the layout features to ccmp,locl,mark,mkmk,kern.
The unicodes specify which characters we want to keep in our first stage font file. Google Fonts seems to use a sensible default for their “Latin” fonts, so I stuck with that. If you want to have more control over which unicodes you include, glyphhanger seems like a great tool which can actually analyse your website to see which unicode ranges are used.
Subsetting my new display font brought my first stage fonts down to only 12.0kB in size! That’s a reduction of a whopping 133kB on some pages, compared to the seven web fonts I was previously loading.
Remember to generate your fonts in WOFF format as well as WOFF 2 for the best browser support. Just specify --flavor=woff and make sure your output-file has a .woff extension.
Second Stage Font
Your second stage font should include all the niceties that were omitted from your first stage font, like kerning, hinting and ligatures. Here’s the command I used to generate the second stage font for DM Serif Text:
pyftsubset "DMSerifText-Regular.ttf" --output-file="DMSerifText-Regular-Latin-Ext.woff2" --flavor=woff2 --layout-features="*" --unicodes=U+0-10FFFFpyftsubset "DMSerifText-Regular.ttf" --output-file="DMSerifText-Regular-Latin-Ext.woff2" --flavor=woff2 --layout-features="*" --unicodes=U+0-10FFFFThis second stage font includes all the available features and the full unicode range supported by the font.
Preloading the First Stage Font
We need to load the first stage font as soon as possible in order to minimise the FOUT (or even worse, FOIT) which would usually occur when loading a web font. Using preload, now with 86.63% of browser support at the time of writing, will ensure that the browser requests the resource as soon as it can.
<link
  rel="preload"
  href="DMSerifText-Regular-Latin.woff2"
  as="font"
  type="font/woff2"
  crossorigin
/><link
rel="preload"
href="DMSerifText-Regular-Latin.woff2"
as="font"
type="font/woff2"
crossorigin
/>You can preload more than one first stage font if necessary, but keep in mind the more you choose to preload, the worse it will affect First Render times or FOUT which we are trying to avoid.
After you’ve told the browser to preload the font, you can just use a normal @font-face rule in your CSS. Put this inline in your <head> to make sure that your font is used as soon as it has been preloaded!
@font-face {
  font-display: swap;
  font-family: "DM Serif Text";
  font-weight: 400;
  src: local("DM Serif Text Regular"), local("DMSerifText-Regular"),
    url("DMSerifText-Regular-Latin.woff2") format("woff2"), url("DMSerifText-Regular-Latin.woff")
      format("woff");
}
@font-face {
font-display: swap;
font-family: "DM Serif Text";
font-weight: 400;
src: local("DM Serif Text Regular"), local("DMSerifText-Regular"),
url("DMSerifText-Regular-Latin.woff2") format("woff2"), url("DMSerifText-Regular-Latin.woff")
format("woff");
}Loading the Second Stage Fonts with JavaScript
We want to load the second stage fonts as soon as possible with JavaScript to minimise the delay before the layout shift will occur. I put this JavaScript in the <head> of my page:
if ("fonts" in document) {
  const font = new FontFace(
    "DM Serif Text",
    "url('DMSerifText-Regular-Latin-Ext.woff2') format('woff2'), url('DMSerifText-Regular-Latin-Ext.woff') format('woff')"
  );

  font.load().then(function (font) {
    document.fonts.add(font);
  });
}
if ("fonts" in document) {
const font = new FontFace(
"DM Serif Text",
"url('DMSerifText-Regular-Latin-Ext.woff2') format('woff2'), url('DMSerifText-Regular-Latin-Ext.woff') format('woff')"
);
font.load().then(function (font) {
document.fonts.add(font);
});
}Browser support for the CSS Font Loading API is pretty good but notably doesn’t include Internet Explorer—however, it’s worth noting that our first stage font will still load in Internet Explorer, it will just be missing extras like kerning. If you do want to support Internet Explorer completely, you can just dump the second stage @font-face declarations into the document head, Zach explains how to do this in his article.
After Optimising the Fonts
Changing the font loading strategy on my website massively reduced the time for the fonts to load and improved first render times, as I was loading fewer resources. Here’s the waterfall graph we saw earlier, showing the time taken to load fonts before optimising:
And here’s the new waterfall graph showing the time taken for fonts to load after switching to system fonts and implementing a FOFT font loading strategy:
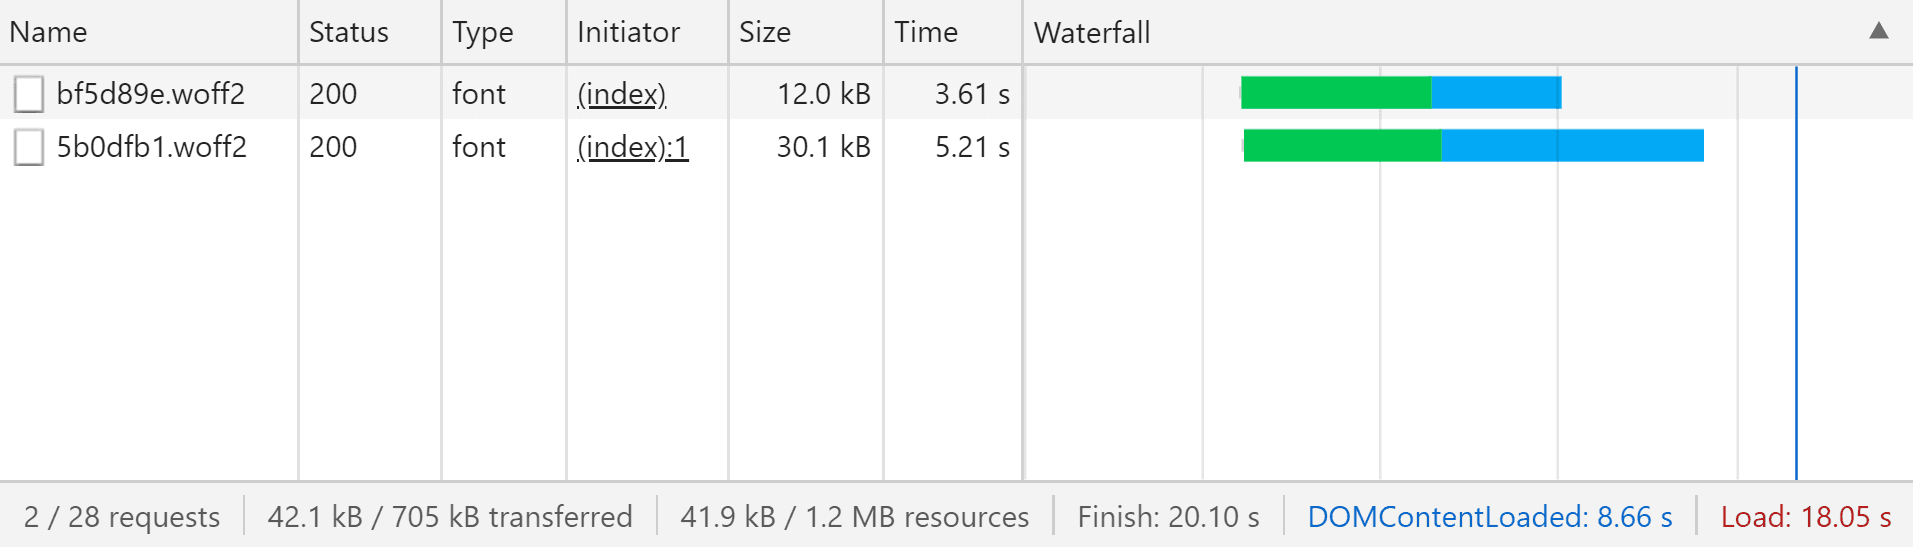
Wow! That has made a huge difference to font loading times: the display font used for the headings of my website now loads after 6 seconds, compared to nearly 9 seconds before. These times were recorded whilst throttling the network; when I remove the throttling, there is no FOUT at all now I preload the first stage font.
I’ve had a lot of fun experimenting with different font loading strategies on my website, I hope that you found this blog post useful and it inspires you to think about the fonts you’re using on your website and how you load them. Happy fonting! 👋